You’ve received a shipment of white boxes from Aurora Scientific containing your brand new muscle test system. You’ve watched our setup videos and familiarized yourself with experimental methods from papers and JoVE. You’re all ready to begin your experiments in earnest. But wait! This is the perfect time to make sure you have all the necessary peripheral equipment to help your experiments run as smoothly and as efficiently as possible.
Part 1: 1200A/1300A
Heating Water Circulator
Each of these systems is designed to utilize a heated water circulator to maintain tissue or bath temperature – a bath of ringer’s solution for the 1200A and in the 1300A system, animal body temperature. The water circulator acts as a passive conductive heat source which constantly circulates temperature controlled water around the glass bath to keep the tissue at a specified temperature throughout the experiment.
The heated circulator is also imperative for our 1300A test systems where the live animal rests on the platform. Both the platform and optional in vitro bath contain inlets for water circulation. Failure to maintain the muscle or the animal’s core temperature will result in compromised force readings.
Anesthesia/Small Animal Anesthesia Machine (Isofluorane)
Some sort of anesthesia is necessary for our 1300A test system as the experiments will be done on live animals. Anesthesia is not necessary when using the 1200A test system or the in-vitro add on bath for the 1300A. Isofluorane can be used in cases where you want to keep the animal alive while removing the muscle.
Injectable anesthesia can be used, however, inhalables such as isofluorane are commonly chosen. Using a complete anesthesia system with nose cones and animal box is useful as it provides a quick method for preparing the animal for the experiments, provides constant/controllable sedation and allows the animal to regain consciousness for longitudinal re-testing.
Oxygen Supply/Cylinder
For the case of the 1200A system, the muscle will require oxygen to stay alive. The system is equipped with a built-in bubbling port that should be connected to a pressure regulated oxygen supply such as a cylinder. This is also the case for the in-vitro add on bath of the 1300A. An oxygen supply will be necessary as well, if using inhalable anesthesia as a vehicle for the isofluorane vapours
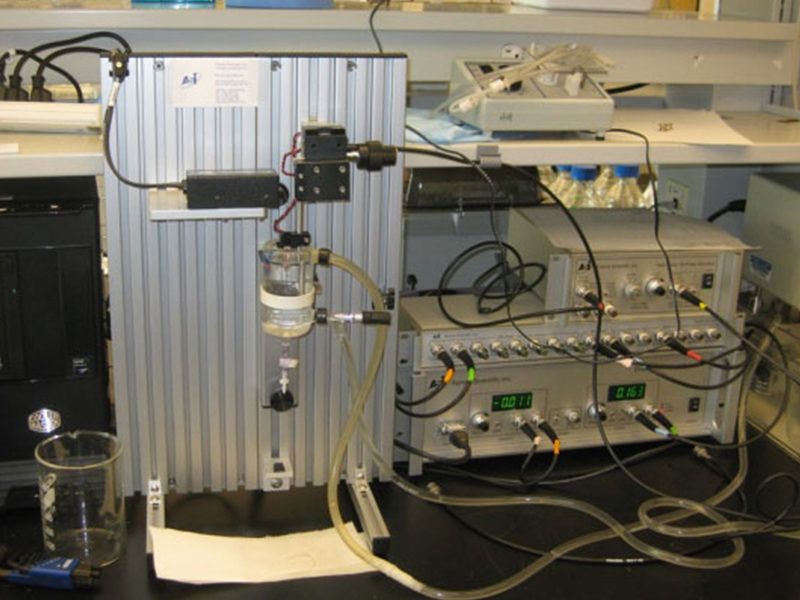
Figure 2: 1200A System with Circulator Attached (Far Right)
Additional Useful items:
- Standard 19″ Instrument Rack or Shelving
- Surge Protected Power Bar or Uninteruptable Power Supply (UPS)
- Suture (For Attaching the muscle to transducer)
- Nair hair remover (aids in landmarking for electrode placement and muscle removal)
- Electric hair trimmer
- Alligator Clips/Helping Hands (helps to hold electrodes during in-vivo experiment)
- Molding Clay/Putty (for joint cushioning in clamp points)
Part 2: 1500A
Heating Water Circulator/Peristaltic Pump
This system is designed for use with small muscles, strips and fibers which requires perfusion of temperature-controlled bath solution. Included with the test system is a one litre jacketed reservoir for perfusate. To keep the perfusate solution closely matched to bath temperature a heating water circulator should be used. Delivery or removal of the solution to the bath should be accomplished with a peristaltic pump to control flow rate.
Oxygen Supply/Cylinder
Much like with the whole muscle test systems in part 1, the perfusate solution which bathes the muscle must be oxygenated. The glass reservoir included with this system has a built in bubbler and should be fed from a regulated oxygen supply or cylinder.
Microscope Features
Our 801C apparatus is designed to be compatable with most standard and inverted microscopes. We also offer additional software for measuring sarcomere length which requires the presence of additional side-port C-Mount adaptors for attachment of a sarcomere measurement camera or laser diode.
There are also a few additional recommendations when selecting an inverted microscope for use with our apparatus, outlined in detail in our blog, “How to select a microscope for an ASI muscle physiology system.
Tissue Attachment
In many cases, researchers investigating low force producing muscle tissue use aluminum foil “T-Clips,” attaching the muscle to a transducer or length controller. For more information visit our blog, “T-Clips, a Simple Method to Attach a Muscle Fiber to ASI Instruments .” Or for more information about suturing small muscles see “Tying a Muscle Fiber/Small Muscle to an ASI Force Transducer and Length Controller“.
Additional Useful Items:
- Standard 19″ Instrument Rack or Shelving
- Surge Protected Power Bar or Uninteruptable Power Supply (UPS)
- Suture (for attaching muscle to transducer/length controller)
- Crystalbond 509 (high melting point, rigid hold of attachments)
- Insect pins/hypodermic tubing (for attaching suture or t-clips to transducer or length controller)
Part 3: 1400A/1600A
– Microscope Features
The 1400A and 1600A test systems are designed for use with most inverted microscopes. However, a few additional features may be required to help your experiments run smoothly. Aurora Scientific offers additional software designed to measure sarcomere length. This requires the presence of additional side-port C-Mount adaptors for attachment of a sarcomere measurement camera or laser diode.
For additional information regarding microscope features we recommend for use with our systems, visit our blog, “How to Select a Microscope for an ASI Muscle Physiology System.”
Vibration Isolation Table
A vibration isolation table or platform is highly recommended for our 1400A system and is an absolute necessity for the 1600A. The 1600A system includes motorized manipulators and these should be secured with screws or bolts to the vibration table isolation platform. Most tables will have tops which are pre-drilled and tapped for standard sized metric or imperial screws. The table itself will also require a pressure regulated air supply to allow the table to ‘float’. However something inexpensive such as simple air or nitrogen can be used for this purpose.
Figure 3: 1600A System set up on Vibration Isolation Table with Tapped Holes
Motor Attachments
Each researcher’s needs can be highly specific and there are many ways of attaching hooks, tubes, or micropipettes to Aurora Scientific instruments to maximize the efficiency of the system. Here are a few blogs with more detailed tips on attaching small fibers/small muscle to Aurora Scientific instruments:
- 3 Tips for Attaching Muscle Fibers/Small Muscles to ASI Instruments
- Building Motor and Force Transducer Attachments
- Tying fibers to Aurora Scientific instruments – detailed instructions
Additional Useful Items:
- Standard 19″ Instrument Rack or Shelving
- Surge Protected Power Bar or Uninterruptible Power Supply (UPS)
- Suture (for attaching muscle to transducer/length controller)
- Insect pins (for attaching suture or t-clips to transducer or length controller)
- Micropipettes (attachment to transducer/length controller)
- Crystalbond 509 (high melting point, rigid hold of attachments)
- Aquarium Sealant or Expanding Foam (small tissue attachment to transducer or length controller)