In-vivo studies are crucial to conducting physiologically relevant research. These types of experiments allow researchers to assess phenotypic changes as well as functional improvements over time in the same animal. This is especially important for longitudinal studies characterizing disease models or testing the safety and efficacy of therapeutic drug candidates. In addition to this, the 1300A 3-in-1 Whole Animal System’s in-vivo capability allows for whole animal functional analysis while eliminating behavioural confounds. This means that muscle group or neuromuscular junction functionality can be assessed whilst removing the subjectivity of motivation-based experiments.
This blog will provide a walkthrough of how to design a study in our Dynamic Muscle Control (DMC) LabBook software, specifically for 1300A in-vivo experiments. We will discuss how our DMC program can be used to create a study with tailored experiments and collect accurate data for high-throughput analysis.
Instrument Setup
Open the DMC LabBook program. From the main window, click “Setup” and then “Channel Setup” from the dropdown menu. Click “Add Instrument” and then select the model and input the serial number displayed on the equipment. Click “Add Instrument”. Next, select your device from the “Force Device” dropdown menu, your device will automatically be selected from the “Length Device” dropdown menu. Next, select “mN-m” for force units and the circular degree symbol for length units. Click “Save Settings” to complete the setup of your instrument.
Creating your Study
From the main window, click on “File” and then “New Study” from the dropdown menu. In the study window, you will name your study and write a brief description. Next, select an animal parameter(s) from the dropdown menu and click “Add”. Animal parameters are factors you intend to keep track of, or measure, throughout the study. Some parameters are fixed, such as date of birth, whereas others are not fixed, such as age. You can also define your own parameters by typing them into the white box, defining your own units and whether the parameter is fixed or unfixed then clicking “Add”. To remove a parameter, select the parameter from the list of added parameters and click “Remove Selected”.
Sample parameters are only required if you are working with a specific/isolated muscle. Sample parameters are not necessary for in-vivo experiments because whole muscle groups, rather than single muscles, are analyzed.
On the right side of the study window, you will see the “Muscle to Add” dropdown menu. Several muscles are listed, however, in-vivo experiments analyze muscle groups. As such, you could type in “Dorsiflexors” or “Plantarflexors” directly into the white box and click “Add”. Note that you can add multiple muscles to a study. To remove a muscle, select the muscle from the list of added muscles and click “Removed Selected”.
Adding Experiments to your Study
The DMC protocol library contains a variety of experiments designed for muscle mechanics. Click “Add Experiment to Study” to open the select experiment type window with six pre-set experiments: Twitch, Tetanus, Fatigue, Force Frequency, Eccentric, and Injury.
In a twitch experiment, a single electrical pulse is sent from the stimulator to the muscle or nerve. This causes a small subset of muscle fibers to contract, thus eliciting a twitch, which is seen as a spike in the force readout. From this experiment you can determine the maximum twitch torque, time to maximum torque, ½ relaxation time, and the rate of contraction or relaxation. As such, it can provide useful insights into muscle twitch dynamics. In addition to this, twitch experiments can be used to optimize stimulation parameters such as the amount of current required to elicit maximum torque. To set up a twitch experiment, click “Twitch” and enter a name (e.g. Twitch – Practice Experiment). Ensure the correct muscle (group) is selected (dorsiflexors or plantarflexors). The pulse width of the twitch can be modified, this is typically 0.2 ms. To finalize and add the experiment to the study, click “Create Experiment” at the bottom of the window. The twitch experiment will now appear in the “Experiments in Study” list. To remove an experiment from the study, select the experiment from the “Experiments in Study” list and click “Remove Selected”.
The above procedure will be done for each experiment you intend to add.
In a tetanus experiment, rapid electrical pulses are sent from the stimulator to the muscle or nerve. This will elicit multiple twitches that, with higher stimulation frequencies, will summate into a fused contraction due to temporal summation. From the force read out, you can determine maximum isometric torque, time to maximum torque, ½ relaxation time, rate of contraction and relaxation, integration (area under the curve), max derivative (ascending slope of the contraction or the rate of contraction prior to reaching its peak), min derivative (descending slope or the rate that torque returns to baseline). Tetanus experiments can also be used to optimize stimulation parameters, such as current, and address issues with electrodes or knee/foot stabilization. To add a tetanus experiment, click “Add Experiments to Study” and then select “Tetanus”. Enter a name for the experiment and select the muscle (group) to be analyzed. For reference, tetanus stimulation parameters can be set to 100 Hz for Stimulation Frequency and 500 ms for Stimulation Duration.
The following are descriptions and reference parameters for the remaining four experiment types:
Force-frequency: In this experiment, the muscle or nerve undergoes succession of tetanic stimulations of varying frequencies. The optimum stimulation frequency can be determined when the force threshold is reached (the lowest frequency that produces maximum tetanic summation). As such, this experiment is useful for observing changes in optimal stimulation frequencies, as well as comparing force-frequency curves between models to assess shifts in fiber type and NMJ function, among others. Click “Add Experiment to Study” and then “Force-Frequency”. Name the experiment and select the muscle (group) of interest. Change the stimulation frequencies by clicking “Add Frequency” and typing in the desired frequency. Then click “Ok”. To arrange the frequencies in ascending order, select “Low-to-High”. To arrange the frequencies in descending order, click “High-to-Low”. Note that a minimum of 6 stimulation frequencies is ideal in order to properly assess the entire range of frequencies (i.e. 10Hz to 200Hz). The following are reference values for force-frequency parameters:
a. Add preferred frequencies as described above
b. Stimulation Duration: 500 ms
c. Time Between Contractions: 60-90 s
Fatigue: In this experiment, pulses are delivered at regular intervals over a pre-set period of time. Change (decrease) in torque shows the fatigability of the muscle/animal. Submaximal stimulation is used so that potentiation can be reached during the first 5-10 contractions (ensuring the muscle does not tire immediately). Following several more contractions, the percent change in torque is analyzed, relative to the initial torque. This is often labelled as “Percent of Initial”. Click “Add Experiment to Study” and then “Fatigue”. Name the experiment and select the muscle (group) of interest. The following are reference values for fatigue parameters:
a. Stimulation Frequency: 50 Hz
b. Tetanus Duration: 500 ms
c. Time Between Tetani: 5000 ms
d. Experiment Duration: 4 min
Eccentric: In this experiment, the muscle is stimulated and then lengthened, inducing slight injury/fatigue depending on the amplitude and velocity of stretch as well as the frequency duration of contractions. As such, this protocol can be used to model sports injury, resistance to injury/fatigue or assess recovery. It is particularly important in deciphering phenotypes such as DMD as they are susceptible to injury, but show nearly normal isometric torque. Click “Add Experiment to Study” and then “Eccentric”. Name the experiment and select the muscle (group) of interest. The following are reference values for eccentric parameters:
a. Stimulation Frequency: 150 Hz
b. Plateau Duration: 300 ms (This is the duration of stimulation before lengthening begins and can be modified depending on your experimental needs)
c. Stretch Displacement: 19.5 (select Absolute °/mm)
d. Stretch Ramp Duration: 100 ms (This is the time required to achieve peak length and can be modified depending on your experimental needs)
Injury: This experiment consists of repeated eccentric contractions, thus inducing a more severe injury. The injury protocol can be used to automate and run multiple eccentric contractions without the need for manual triggering to run the next repeat. Click “Add Experiment to Study” and then “Injury”. Name the experiment and select the muscle (group) of interest. The following are reference values for injury parameters:
a. Stimulation Frequency: 150 Hz
b. Plateau Duration: 300 ms
c. Stretch Displacement: 19.5 (select Absolute °/mm)
d. Stretch Ramp Duration: 100 ms
e. Number of Contractions: 10-20
f. Time between Contractions: 20-30 s (start with 20)
Customization
Click “Customize Experiment” at the bottom of the Injury window (note that this step can also be done to customize eccentric experiments). Click “Edit” below “Select Protocol” near the bottom left of the window. Here, you can edit the protocol within the sequence. Ensure that “Unitized” is selected at the top right of the protocol editor window.
Select the second row of the protocol table and change the “Wait (s)” value to 0.1 in the middle section of the protocol editor window (as seen in the lower red box in Figure 1) so that the muscle is passively moved in the opposite direction of the eccentric contraction to allow for maximum lengthening during stimulation. Note that the “Wait (s)” value is the amount of time it will take to begin the row’s command once the previous row’s command is completed.
Figure 1. Screenshot of Protocol Editor in DMC showing adjustment of “Wait (s)” and “Value to Ramp” parameters in the red and yellow boxes, respectively.
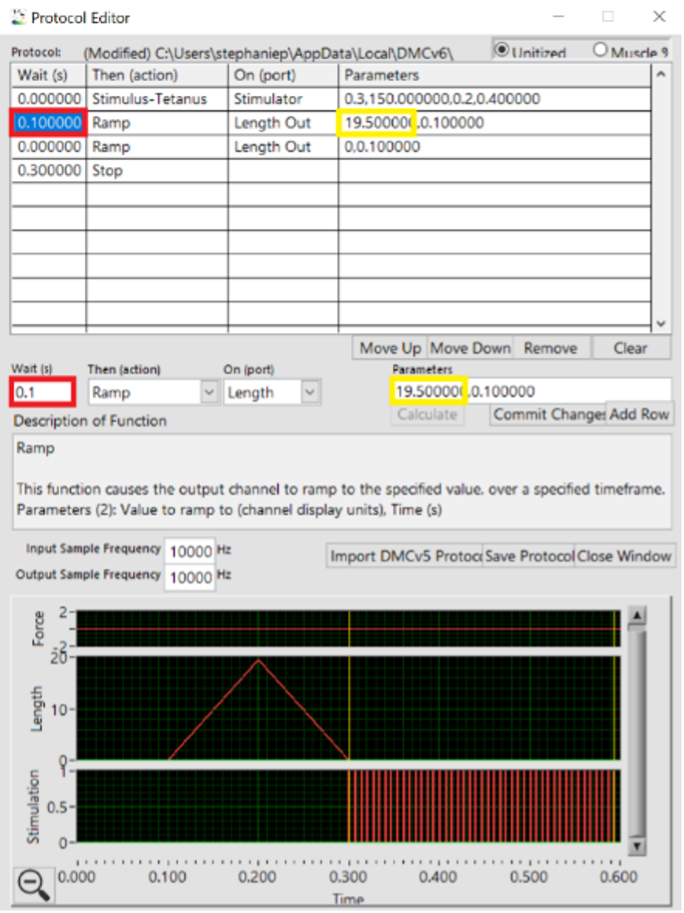
The “Value to Ramp to” parameter determines the degree to which the footplate will extend. If you intend to do dorsiflexion, change the “Value to ramp to” parameter to “19.5” in the parameters box in the middle of the editor (as seen in the lower yellow box in Figure 1). If you are doing plantarflexion (as shown in the video tutorial), ensure it is set to “-19.5”. Click “Commit Changes”.
Select the third row and change the “Wait (s)” value to 0.4. Change the “Value to ramp to” parameter, which is “0”, to “-19.5” if doing dorsiflexion (or “19.5” if doing plantarflexion). Click “Add Row” and using the “Move Up” button, move this command to the third line of the protocol. By rotating the footplate from 19.5° to -19.5°, the full range of the footplate (39°) can be used.
While the fourth row is selected, ensure the “Value to ramp to” parameter is “0” and click “Commit Changes”. This will move the footplate back to a neutral position before ending the experiment.
In the graph portion near the bottom of the protocol editor window, the peak of the active lengthening should line up with the end of stimulation (as seen in the blue box in Figure 2) and result in a passive return to the initial position.
Figure 2. Screenshot of Protocol Editor in DMC showing alignment of active lengthening peak and end of stimulation in the blue box.
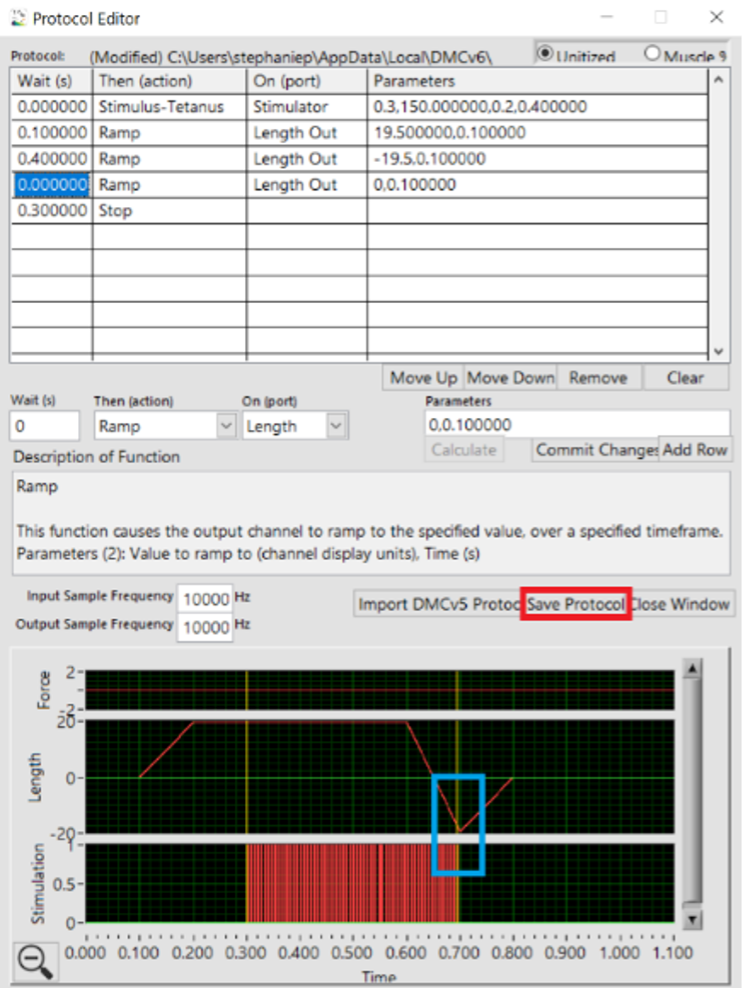
Click “Save Protocol” in the middle of the protocol editor window (as seen in the red box in Figure 2). Now that you are on the sequence editor window, select the protocol you created from the “Select Protocol” dropdown menu. Define “Time to Next” (how long to wait until the next protocol or repeat is executed), “File Marker” (unique identifier for individual protocols) and “Repeat” (total number of contractions -1) if needed, then click “Save Sequence”.
Once you have created your experiments, you can then edit the order in which they run. In the create new study window, you can select one of your experiments from the “Experiments in Study” list at the bottom right. You can then toggle the up and down arrow to adjust the placement of that experiment in the list. A common order of operations is as follows, Twitch, Tetanus, Force-Frequency, Fatigue OR Eccentric/Injury. Once you are happy with the order of the experiments, click “Create Study” at the bottom right corner of the window. Keep in mind that once a study is created, it is locked and cannot be edited. However, you can utilize and edit a previously written study by clicking “Import Settings from Existing Study” at the top right of the create new study window.
Adding Animals to your Study
Now that you have created your study, you will need to add animals to it. Click “Change” to the right of where it says “Select an Animal”. Select an animal from the list if it has already been added to the study. If this is a new study without any animals, click “New Animal” from the pop-up window and enter information such as the ID (animal identification), age, and any other parameters previously added to the study. Once finished, click “Submit Parameters”. Note that you can toggle the “Sample” number, which can be used if you are working on multiple muscles in the same animal (for example, the dorsiflexors in each leg). You can edit the sample parameter information at any time by clicking “Edit Sample Parms” in the main window. For example, if you are doing a longitudinal study where you want to analyze the same animal on day 30 as you did on day 1, you would select the animal (that is already in the study) and update their parameters. This could include changes in mass or age as unfixed parameters are not carried over. Because in-vivo experiments are non-terminal, they are useful in longitudinal studies which allow you to assess both phenotypic changes and functional improvements over time in the same animal.
Running the Experiment
Once you have created your study, added an animal to the study, and set up the animal on the apparatus, only stimulation optimization must be completed before running the study. In the main window, click “File” and select “Live Data Monitor” from the dropdown menu. This window allows you to view contractions in real time. On the 701C stimulator, ensure the “Range” dial is set to 10mA and the “Adjust” dial is set to 1 (dorsiflexion) or 5 (plantarflexion). Next, in the program’s main window, click “Prepare Experiment” and then “Configure Instant Stim”. You may populate the parameters with the following values: 100 Hz, 0.2 ms, 1, 1 Hz, 1 s. Then, click “Instant Stim”. This will produce a twitch stimulation and you should observe a twitch spike in the force readout of the live data monitor. Increase the current output by turning the “Adjust” dial on the stimulator and click ‘Instant Stim’ again and you should see that the torque measurements in the force readout increase, which is displayed in the ‘prepare experiment’ window in a different colour. Repeat this process until the amplitude of the twitch plateaus whereby an increase in current no longer results in an increase in torque. The optimum current is the lowest current that produces the maximum torque. Note that too much current may activate antagonistic muscles of the leg resulting in aggregate torque and thus lower torque measurements. Once determined, the optimum current stimulation can be used when running the remainder of your study experiments.
Again, before running the experiments, click “File” and select “Live Data Monitor” from the dropdown menu in the main window. Ensure that you also click “Analyze Results” in the main window. This will provide a snapshot of the most recent contraction as well as populating prior contractions from experiments consisting of multiple contractions (i.e. Force-Frequency, Fatigue and Injury).
Your experiments are ready to run and your data can be viewed throughout the duration of each experiment. Click “Run Experiment” in the main window and it will run the experiment displayed in the bottom left “Experiment” box. Click “Next” or “Prev” to toggle between experiments within a study.
For a more detailed overview on how to set up and perform in-vivo footplate experiments with murine models, check out the following tech blog: https://aurorascientific.com/experimental-methods-for-in-vivo-footplate-procedures/