Aurora Scientific’s 1300A/1305A Whole Animal Systems have been instrumental in providing the research community with a tool to characterize complete muscle function using three powerful assays, hence the name, 3-in-1! In this blog we will explore a few tricks of the trade so to speak of the in vivo assay and how to get the most reliable measurements from your animals. The barrier to entry with the in vivo technique is fairly low. There is no complicated surgery or special handling of the animal required, but like any experimental technique it can take a bit of time to master. It is our hope that these best practice tips which will not be found in the published literature can help you obtain mastery more easily.
For a more detailed step-by-step overview of the technique, refer to the blog “Experimental Methods for In-Vivo (Footplate) Procedures” .
Hindlimb Hair Removal
When preparing the animal for hindlimb testing it is important to remove the hair of the leg that will be tested. This can be done with an electric hair shaver and/or Nair hair remover as shown below (Figure 1). To increase efficiency during your testing, hair removal can be done in advance of the muscle function measurements and if you plan to test both hindlimbs, hair on both sides should be removed. Proper hair removal is vital to ensure proper landmarking of the needle electrodes. By visualizing either the anterior or posterior compartment, you’re able to accurately and reproducibly insert the electrodes to stimulate the muscles of interest, both in terms of depth and position. In addition, you’re able to visualize the knee joint to ensure you’re clamping in the right area and eliminating the hair in the area ensures the knee won’t slip. The knee slipping out of the limb clamp can be a big problem with insufficient hair removal and thus we recommend removing all hair on the leg of interest up to about mid femur.
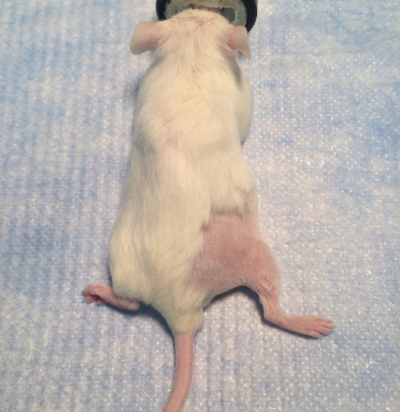
Figure 1: Right hindlimb fully shaved for testing. (Rinkevich et al. 2016 Bio-protocol)
Anesthetizing the Animal
Anesthesia must be used during the experiment, though what anesthesia is used can vary. Inhalable anesthesia such as isofluorane is by far the most common choice for this experiment. Inhalable anesthesia will quickly act on the animal and can be adjusted throughout the experiment. Animals will wake from inhalable anesthesia relatively easily (useful for repeated measures over days) but may also wake during the experiment if the nose cone apparatus moves.
If using inhalable anesthesia, you must also restrain the nose cone somehow to the plate to avoid it slipping off during the experiment. This is usually best accomplished with tape. Remember also to put drops in the eyes of the animal if a non-terminal measurement.
Injectable anesthesia such as Ketamine-Xylazine or Avertin can be used here but note that is generally takes longer to begin working and may be more difficult to dose for certain animal models, especially when boosters are required mid-experiment. No nose cone is required with this case which can be helpful with animals which are particularly large.
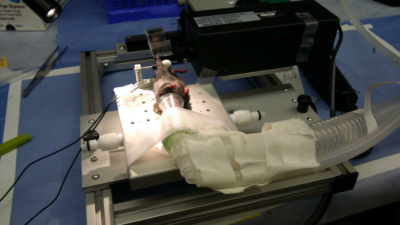
Figure 2: Anesthesia nose cone with scavenge line properly fitted to plate and animal (Zhen Yan lab, University of Virginia)
Stabilizing the Knee
When it comes to in vivo ankle torsion measurements, proper knee stabilization is one of the most important components of the animal setup. To do this properly, you want to locate the patella which will be clearly visible when the leg is shaved. By holding the animal’s foot and pulling the leg through the U clamp, you can align the knee joint with the knee pad and firmly press the rod/pad against the knee joint or slightly proximal to the knee joint (Figure 3). The best method for pressing the rod is to use the thumb of one hand until you feel some discomfort. Use your other hand to tighten the set screw to keep the rod in place. Once clamped, you can check the stability by moving the foot up and down thereby rotating the lower limb about the knee joint. Another common test involves tapping the tibia of the animal with the side of a set of forceps or a small screwdriver. If there’s noticeable movement in the leg, repeat this procedure until secure. Aurora Scientific always recommends checking the knee clamp after taping the foot into the pedal. Adjustments or re-clamping the knee at this point is relatively common.
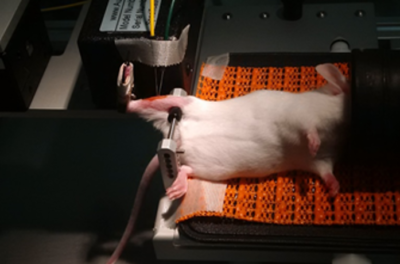
Figure 3: Mouse under anesthesia with right hindlimb secured to the apparatus (Courtesy of Cliff Bayer Lab, VA Medical Center, Boise)
Compliance in the knee joint almost always leads to force detriment and skewing of the contraction profile as seen in Figure 4 below. In A you see a profile of a tetanic contraction that shows a slower contraction rate (red line) due to compliance in the leg/knee which causes a slow rise in contraction. Another key indicator of knee instability or improper clamping is an ‘overshoot’ of the tetanus at the plateau region, shown in both A and B below (red arrows). If you observe this on your trial contraction traces, then it is strongly recommended you re-clamp the knee properly.
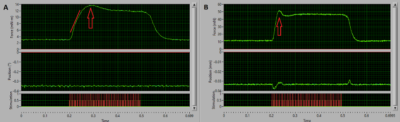
Figure 4: Example tetanic contractions showing slow contraction rate (A) and overshoot (B) indicative of unstable knee clamping.
Foot Positioning and Leg Tension
Once you’re confident the lower limb is stable you can grasp the toes with your fingers or forceps and maneuver the dual-mode lever and footplate into position in front of the foot. Then lower the heel into the groove of the footplate, ensuring the heel and toes are flat against the pedal. Align the lower leg so that the ankle is at a 90 degree angle and the Tibia is in line with the pelvis.
Now that the lower leg of the animal is aligned, you need to set an ideal resting tension to ensure you’re getting maximum contraction. To do this, monitor the toes of the animal at rest with the foot flat against the foot pedal, like Figure 5A. Using the stage holding the dual-mode motor, rotate the fine manipulator dial as to slowly move the footplate closer to the animal. As you do this, notice the toes curl slightly as in Figure 5B below, this is a good indicator that the leg tension is optimal and ready for you to tape. We recommend using 3M Transpore as it is easy to tear into small strips, does not stick to gloves well and is readily available even at your neighbourhood pharmacy. Start with one wrap around midfoot and use forceps to make sure the tape is tight. Then use thinner wraps around the ankle to make an ‘X’ pattern. Once this is done you can begin to place your electrodes.
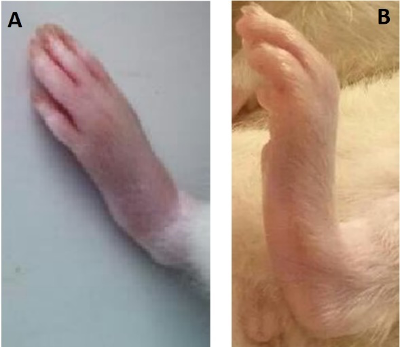
Figure 5: Appearance of a rat foot when flat (A) and the resultant toe flexion (B) in the foot when the proper leg tension is reached.
Electrode Placement
When it comes to needle electrode placement, there isn’t a one size fits all technique, but a few little tricks could go a long way to consistent and reliable data. Stability of the electrodes is incredibly important and when they are unstable, you can visualize this in the tetanus plateau region which appears as wobbles or oscillations, (colloquially referred to as the ‘Bart Simpson effect’ by Aurora technicians). To minimize electrode movement during contraction, we recommend taping the leads to the motor prior to inserting them, This way, the length of the stable portion does not change and taping after the fact can lead to electrodes falling out or moving to a place less desirable. An alternative is to use hobbyist helping hands or some fixed alligator clips to hold them in place of tape.
Plantarflexion
The largest learning curve for this assay is the electrode placement, where to insert to activate the proper muscle compartment/group as well as how deep to insert to ensure you’re getting full contractions. Because of the size and tendon attachment point, the plantarflexors (i.e. Gastrocnemius, Soleus, Plantaris) will produce approximately 10x more torque than the dorsiflexors. Therefore, slight co-contraction of the antagonistic group will not overwhelm the contraction. This makes electrode placement for the plantaflexor group generally quicker to learn. For nerve activation of the muscles, there are 2 main ways to stimulate this group. The first is sciatic stimulation, here, locate the sciatic nerve running along the hip/femur and insert both electrodes into this area relatively close together without touching (Figure 6A). Alternatively, you can place the electrodes about the tibial nerve which branches from the main sciatic behind the knee joint in the popliteal fossa (Figure 6B). Sciatic nerve stimulation will generally produce co-contraction of the dorsiflexor group so it is not really recommended unless you have ablated the TA tendon and the procedure is terminal.
The other form of stimulation is direct muscle which is used to assess muscle function without nerve input, which is especially useful for neurodegenerative conditions which affect the nerve branch and/or neuromuscular junction. First, pinch the skin on the side of the calf area and pull it away, then slowly slide one needle electrode subcutaneously near the muscle belly, then insert the second close to the first without touching (Figure 6C).
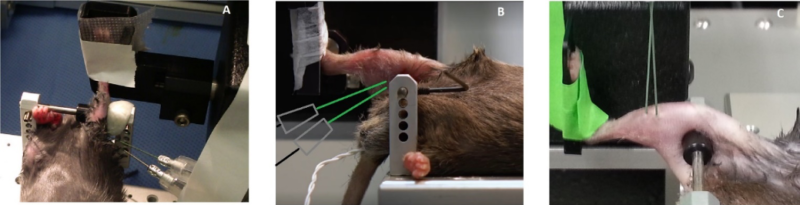
Figure 6: Example configurations for electrode placement to stimulate the sciatic nerve (A), tibial nerve (B) or the muscle directly (C).
Dorsiflexion
Conversely, the antagonistic muscle group are the dorsiflexors (i.e. Tibialis Anterior, EDL). This group of muscles produces similar forces to the posterior compartment when in situ or in vitro, however due to the tendon attachment point of the anterior muscles (distal to the ankle joint), the amount of torque produced about the ankle is as mentioned approximately 10x less. Even slight co-contraction from the plantarflexor group may result in no contraction detected and thus electrode placement is much more difficult to master with these muscles. Needle electrode placement will seem much more finicky (especially in mice) and needs to be more precise as any misplacement or too much current will result in activation of the posterior compartment and plantarflexion.
Much like with the plantarflexors, you can use a pair of forceps to pinch the skin to give you subcutaneous space to insert the electrodes. Once the skin is lifted slightly, slowly guide the first electrode vertically into the skin around the mid-belly of the Tibialis Anterior (TA), lateral to the midline of the Tibia. Once through the skin, let go of the electrode and do not go any deeper. Follow suit with the second electrode and place it near the first (Figure 7A). It is extremely important you do not place these electrodes too deep (i.e. into the muscle) as this will most likely result in activation of the antagonist compartment. An alternative and effective way of placing the electrodes is by eliciting a twitch stimulus after placing the first electrode and ‘sweeping’ the area under the skin next to the TA to find the optimal spot that results in a maximum twitch contraction. Once this is found (Figure 7B; inverted), you can secure the second electrode. Note that this sweeping technique generally will require you to increase the current slightly.
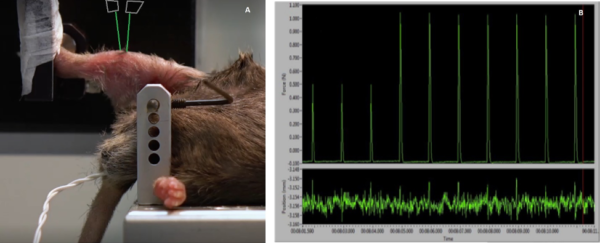
Figure 7: Direct muscle stimulation of the anterior compartment to elicit dorsiflexion (A). Optimizing twitch force while positioning one of the electrodes (B). Note: Twitches inverted for visualization, normally downward deflections.