Here we will cover some of the more common issues that researchers encounter when using our miniPID Fast Response Olfaction Sensor. If you encounter an issue with your device, please do not hesitate to get in touch with any member of our team and they will be more than happy to hear about your issue and troubleshoot it accordingly.
The signal does not change when presented with an odor.
The 200B minipid uses a UV lamp to ionize a gas compound that enters the ionization chamber inside the sensor head. These ions create a differential which can then be measured by the electronics. When there is no signal coming out through the miniPID the first thing to check is if the lamp LED is lit on the controller.
- Turn on the controller and wait for the lamp to light. When you haven’t turned the PID on for a while it may take a little bit longer to ignite. You can turn on the miniPID regularly (about once a week) to prevent this.
- If the lamp does not light using circuitry, you can use the manual lighting trick. Open the cap on the back of the sensor head, disconnect the section tube and with the PID on, carefully slide the lamp out and back in to alter the electromagnetic field and ignite the lamp. If the lamp is still viable, it will ignite after repeating this a few times.
Should the lamp not light this way then it’s possible the antenna responsible for lighting is disconnected or malfunctioning. Remove the 4 screws on the back of the sensor head which hold on the bezel plate where the lamp is housed. After removing the bezel plate, slowly slide the white plastic cylinder out (without lamp inside) to confirm whether the black wire is connected to the antenna AND the circuit board inside (see Figure 1). If so, reassemble this and proceed to next step. If the antenna is loose on the circuit board, simply push it back into the fitting. Should it be loose on the gold fitting on the side of the antenna, you can either solder this back on or return the unit to Aurora for repair. If you close the cap on the lamp housing too tight, the wire inside can twist and come loose so always take care to not overtighten this cap.
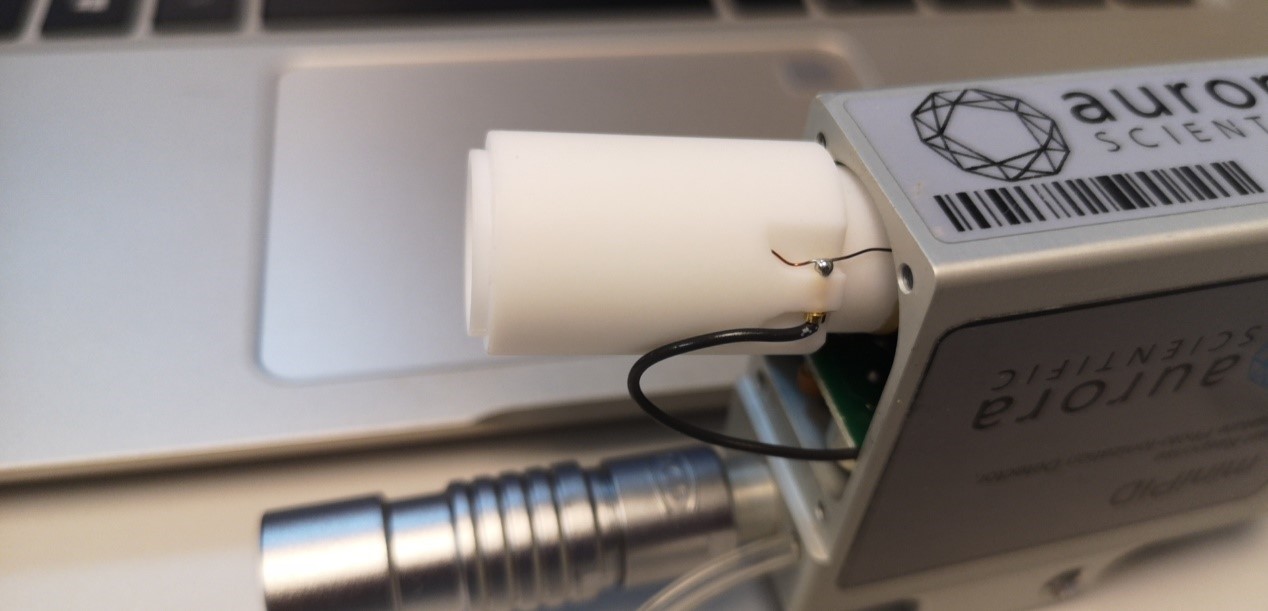
Figure 1. Lamp housing revealing intact black wire connected to antenna and lamp lighting circuit.
- If the lamp still doesn’t light, whether this circuitry is intact or not, then it likely needs to be replaced. This can be checked quickly with a spare lamp if present.
If the lamp is on and there is still no change in signal:
- Check whether there are any LEDs illuminated on the front panel meter of the controller, ideally the unit should be set to a baseline of 100mV prior to detecting odorant, adjust the offset to this level first and try again. Check the connection between the miniPID control box and the signal interface. You can replace the BNC cable to see whether there is any change.
- If the problem remains, you can use your finger to touch the inlet needle on the sensor head to feel the suction of the miniPID. If you don’t feel the suction on your finger, you can open the control box to check the pump (Figure 2, red square) inside the control box. First, make sure the power plug of the pump is not disconnected. Second, check all the tubing to ensure it securely attaches to the pump and fittings and inspect the filer upstream of the pump for any clogs if the pump is noticeably struggling.
- Finally, check the output with a strong odor source such as a sharpie next to the inlet needle to see if the signal saturates. If so, it is possible the run voltage of the lamp needs to be adjusted to optimize output (see section below).
- If the lamp is lit, the suction of the miniPID is normal and the signal is not saturated, you should return the device to Aurora for evaluation.

Figure 2. Inside miniPID controller highlighting the pump.
My miniPID output is lower than usual
If you find that the output signal from the miniPID for a given odor is much lower than normally observed, then the lamp itself could be dirty and coated with residual odorant.
- Remove the lamp from the sensor head and clean it with methanol using a Kim-wipe and let dry. Often a dirty lamp can show a higher baseline.
- If the output/baseline does not change after cleaning, then you may need to increase the lamp run voltage in the control box, as the lamp may be dim or flickering which can cause a low signal output. Turn on the unit and light the lamp using normal means, or the manual procedure (described previously). Once lit, remove the circular cap and turn down the ambient lights in the lab.
- Remove the lid of the control box and locate the lamp run potentiometer, labelled PT1. Using a small flathead screwdriver, you can adjust this potentiometer and observe whether the glowing of the lamp appears visibly brighter. Note that you should perform this adjustment slowly (perhaps ½ turns at a time) and always mark the starting position of the potentiometer in case you need to start fresh from the factory calibrated position. Also, if you observe any flickering (even if the lamp appears brighter) turn back the potentiometer to the point where no flicker is observed. The flicker will manifest itself as a noisy baseline. This should optimize the lamp brightness and thus the output.
If neither of these resolve the problem, it’s possible that the lamp needs to be replaced. If you have a spare lamp you can use it to test it out or should consider getting an additional one to test the output.
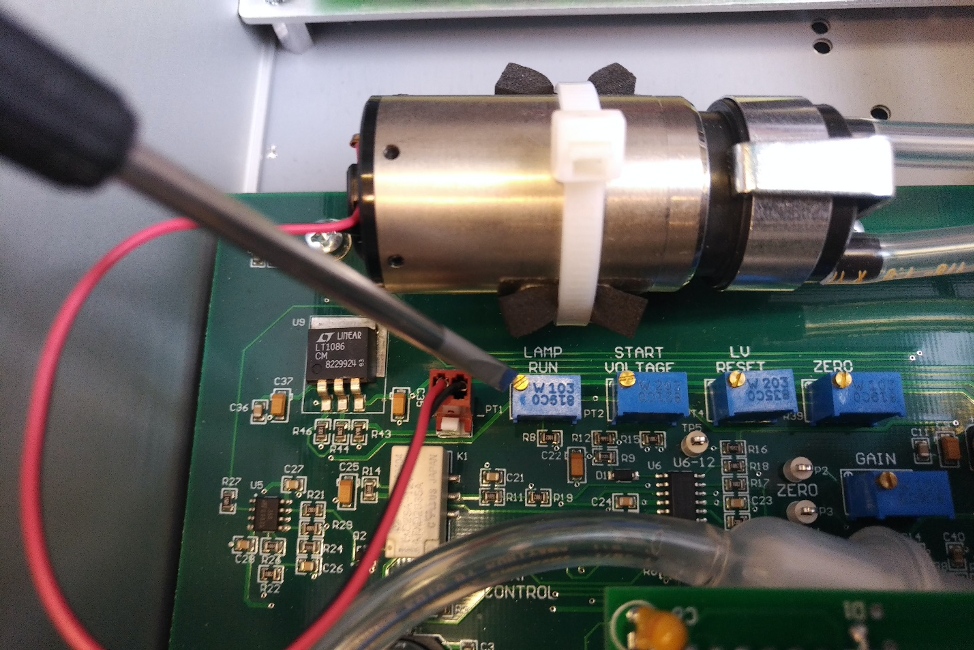
Figure 3. Adjusting Lamp Run Potentiometer.
My baseline is moving
Usually, the most common reason that the baseline of the miniPID drifting is that the humidity of the experimental environment is too high or is fluctuating. As mentioned before, the PID uses a UV lamp to photoionize the air being sampled. Water can be easily ionized and creates a large signal, thus if the humidity is too high, the baseline will drift and can cause a large offset that could mask any odorant being recorded.
- It may be enough to flush the miniPID with a clean, dry airstream to reset the baseline.
- If you are using a sticky or volatile compound, it is important to clean the lamp with methanol and allow to dry to ensure the baseline doesn’t remain high or fluctuate and that output remains high. A dirty lamp tends to produce little or no signal output
- Should neither of these resolve a drifting baseline, it could indicate the lamp is either flickering or too dim to produce a stable output. To check this, remove the lid of the miniPID controller and turn down the ambient light in the room. With the unit on, unscrew the cap of the lamp on the sensor head and observe the lamp for obvious flickering or dimness. Should the lamp run voltage need to be adjust follow the steps in the section above. If unchanged, a new lamp may be required.
The LED lights on the front panel cannot be changed with the offset dial (none or all lit)
If the miniPID output or LED meter board shows a saturated signal (+/-10V, all or no LEDs lit) there are number of things that could be the cause.
- First try adjusting the offset dial by turning it counter clockwise, until there are only 1 or 2 LEDs lit on the control box display (this represents approximately ~100-200mV of output baseline). Alternatively, increase offset clockwise should no LEDs be present to reach the same level
- If this does not solve the problem and the signal remains saturated, it’s possible a highly volatile odorant which is very ‘sticky’ has coated the lamp itself resulting in a high baseline. Remove the lamp from the sensor head and clean the bottom of the lamp with methanol (not ionized with PID) and allow it to dry prior to replacing. Once replaced, note or record the baseline voltage and adjust to 100-200mV if possible
- In addition to volatile compounds, high levels of humidity in the airstream will cause an offset. It may be enough to flush the miniPID with a clean, drier airstream (as noted above). This is good practice even with common compounds which are not particularly sticky or volatile.
- If the saturated signal remains, it is likely that some op amps on the electrometer board are damaged and the unit needs to be returned for service.
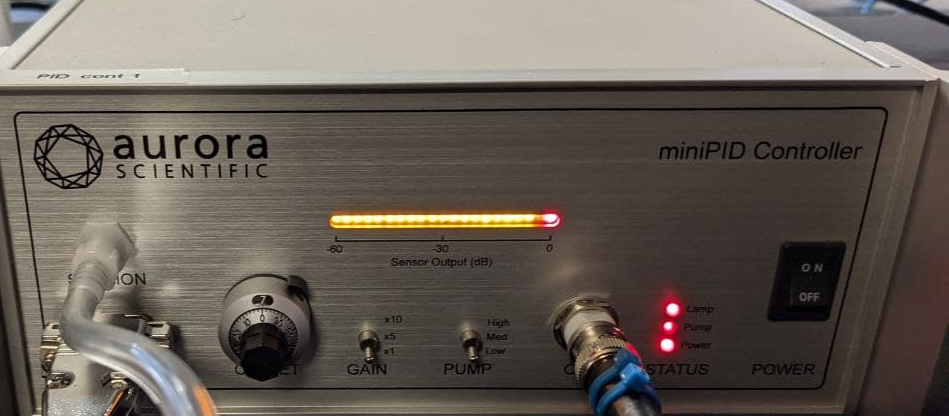
Figure 4. Front Panel LEDs all lit up indicating a saturated signal.