Aurora Scientific’s 1300A/1305A Isolated Muscle systems have been relied upon by researchers worldwide for nearly 20 years. Though the systems have evolved somewhat in that time, the best practices for making contractile measurements of isolated tissue have not. This blog is meant to shed light on some of the tips and tricks that may be helpful when performing these experiments that are not necessarily discussed in the literature
For more detailed information about performing an in-situ experiment with a 1300A/1305A system from start to finish please review the JoVE publications linked on our videos page.
Restrain the foot as well as the knee
Attaching to the muscle itself is quite similar to the methods described in the tips and tricks for measuring muscle function in-vitro blog. Although the surgical procedure is much simpler, the tips on how to surgically access the muscle and how to attach to the tendon are still relevant for both the in-vitro and in-situ cases.
The in-situ experiment requires that we expose the muscle and suture to only one end of the muscle. This greatly simplifies the surgery that we must do as the delicate process of removing the muscle from the body is no longer required. Additionally, only one tendon is cut so the muscle remains anchored to the knee while performing the suturing.
Despite these simplifications, the muscle still must be properly restrained to ensure the contractile force is transmitted to the transducer. In this case, it consists of clamping the knee joint and restraining the ankle joint, so it does not interfere with the contractions.
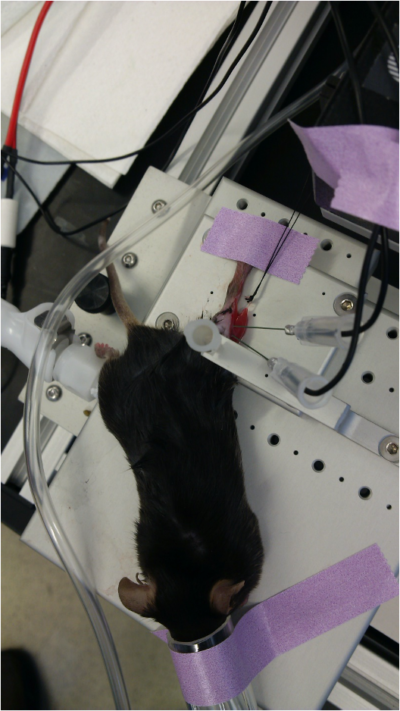
Figure 1: Mouse TA being tested in-situ – Knee clamped via needle.
There are two main ways to clamp the knee when performing an in-situ experiment. The first (pictured) is with a sharp pin or needle which is meant to be inserted directly through the knee. The needle is then locked in place with a set screw and will align with a small hole in the plate below the leg. The second method is similar but instead uses a sharpened screw to pinch down the knee and is not intended to penetrate through the leg.
It is also important to restrain the foot in some way during this experiment. Although the tendon which inserts at the ankle joint will be severed, there are still motion artifacts of the foot and leg which is caused by residual contraction of other muscles (which are still fully attached to the joints) during stimulation.
It is possible to use a sharp pin to tack the foot down to the plate, but in general it is sufficient to simply tape the foot down.
Keep the exposed muscle moistened with solution
Although the in-situ experiment eliminates the requirement for surgically removing the muscle to immerse it in solution, there are still steps we must take to maximize the viability of the tissue during the experiment to ensure best results.
We know that the muscle will remain viable due to it being perfused with blood and oxygen, as the animal is still alive. However, the tissue is still partially exposed once the skin is removed and to prevent the fibers on the surface of the muscle from drying out and dying, we must keep it moist.
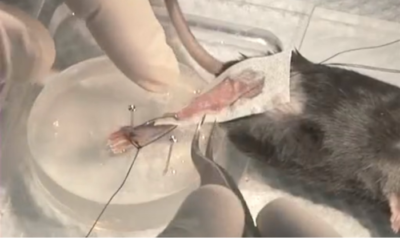
Figure 2: TA Muscle being attached for in-situ test with Ringer’s solution moistened Kim-wipe.
One method of achieving this is to moisten some sort of tissue or wipe and lie it gently overtop of the muscle as shown in Figure 2. This will create a barrier to the outside atmosphere but is gentle enough that it will not hurt the muscle or affect the contractile measurements. It is essential that the wipe be re-moistened periodically with some fresh Ringer’s solution. It can also interfere with the contractile measurements as shown in Figure 3.
An alternative method is to simply drip the solution onto the muscle every 5 minutes. While this may penetrate the entire surface area of the muscle slightly better, the researcher must remember to perform this step or use a low flow peristaltic pump. Management of the waste Ringer’s solution must also be considered.
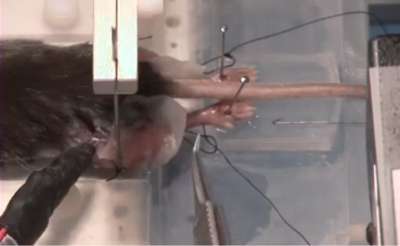
Figure 3: Moistened wipe in place during contractile experiment.
Choice of electrodes
Unlike with an in-vivo experiment, the user has the choice of two different styles of electrodes since the study is typically terminal. These are either the needle style EMG electrodes which are inserted subcutaneously, or some sort of hook or suction electrode which can connect directly to a nerve of interest (i.e. Sciatic Nerve). There are pros and cons of using each method which we will subsequently describe.
Some pros of the needle electrode option is that they are simple and straightforward to use, they can be re-positioned any way the user desires (i.e., for nerve stim or direct muscle stim) and they require no additional surgery or special handling of the animal to produce stimulation.
In general, they are better for producing direct muscle stimulation as the exposed nature of the animal’s leg means there may not always be a suitable location to anchor the electrodes close enough to a nerve. These electrodes are simply inserted into the animal’s flesh which means that they can move during the experiment and some means of holding them in place is typically required.
Typically, if using this method, we suggest inserting them near the muscle of interest, perhaps even in the small gap of fascia between muscles. This will help elicit a maximal contraction with the least amount of stimulation current needed and thus will minimize movement artifacts from other muscles of the leg. (See Figure 4).
Figure 4: Needle electrodes inserted near the knee joint to stimulate TA muscle.
Some pros of the nerve style electrodes are that they do not require any guesswork to landmark their placement, they require even less current to cause a maximal contraction and they are typically quite durable and do not require frequent replacement (i.e. due to blunting of the EMG needle style).
However, the hook or suction type electrodes require a significant amount of extra surgery to isolate the nerve which adds time and effort to the procedure. Additionally, it is important that the nerve be accessed as near as possible to the muscle of interest.
For instance, it is quite possible to elicit a contraction by accessing the sciatic nerve near the hip of the animal however this will contract the entire leg and cause a large movement artifact due to all the muscles contracting in unison. It would be better to stimulate the common peroneal nerve instead. (see Figure 5)

Figure 5: Lab built hook electrode attached to peroneal nerve in mouse.