If you’ve recorded any videos of your muscle samples in HVSL/VSL and would like to use them in a presentation, they must first be exported into a common video file format. This blog is meant to be a step by step guide for how to accomplish this.
** This article is relevant to users of the legacy 900B and 901B, as well as the latest version, 901D – High-Speed Video Sarcomere Length System.
Step 1:
Once you have recorded some video in HVSL/VSL, first find the “Playback” tab on the menu bar and click “Open”. The video playback window will pop up.

Step 2:
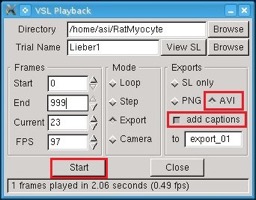
At the top of the HVSL/VSL Playback window there are text boxes for you to enter the Directory and the Trial Name that you wish to playback. Alternatively, each textbox has a browse button which opens a file explorer which can be used to select the appropriate folder.
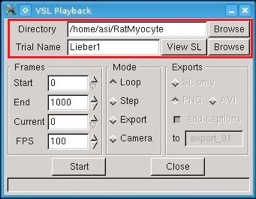
The trial should be the folder containing the trial, not a specific file within it.
Step 3:
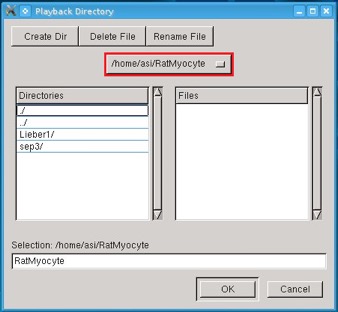
A window entitled “Playback Directory” will pop up if you press the browse button next to Directory on the VSL Playback window. Select the desired location and press “OK”.
Step 4:
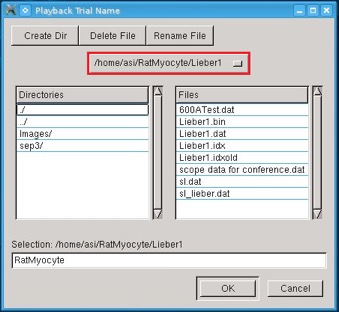
A window entitled “Playback Trial Name” will pop up if you click the browse button next to Trial Name on the VSL Playback window. Select a desired file location and press “OK”.
Step 5:
After setting the locations of both Directory and Trial Name, make sure it is on “Loop” mode (if not then press the diamond button next to “Loop”). Once this is done, press “Start” to review the data on the initial main window to ensure this is the correct video to export. Note that the exact number of frames will automatically update after pressing the start button. You can stop playing it at any point by pressing “Stop”.
You should loop through the video sequence once before exporting.

Step 6:
After reviewing, you can enter a number next to Start or End in the Frames column and press Enter on the keyboard to change the range (within the original range) desired to export.
You do not need to make any changes if you would like to export the entire range.

Step 7:
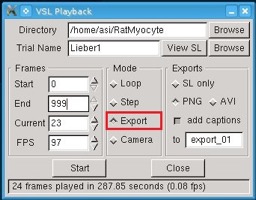
After selecting the desired range of frames, press the diamond shaped button next to “Export” mode.
Step 8:
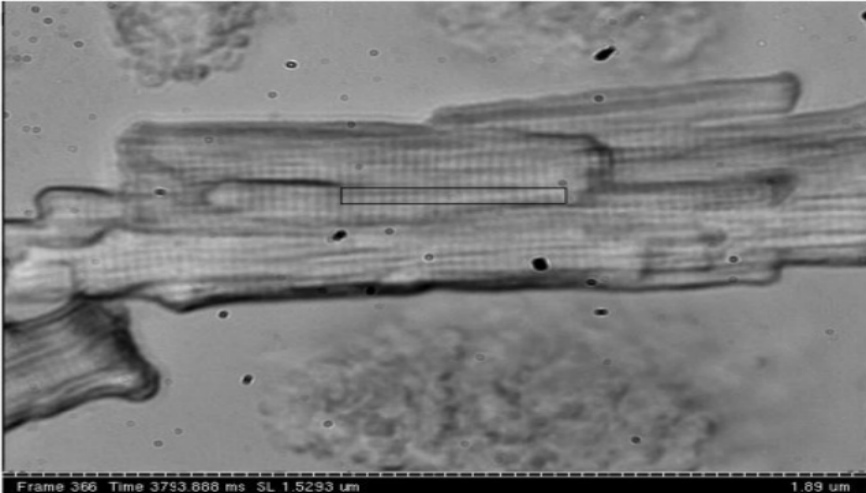
Press the diamond shaped button next to “AVI” and press “Start” to begin exporting the video. Depending on the size of the video recorded, it may take a while to finish the export. There is an option to add captions to the export. This adds a display at the bottom of the frame showing the frame number, time, sarcomere length and a ruler with the reference length. The captions option also displays the currently selected ROI calculation in the exported file, which allows you to see the area where the SL calculation was performed.
Step 9:
Exported data is created in a folder inside the main trial folder that is set when recording the data. The folder is named in the format of export_xx by default, starting with 001 and auto incrementing thereafter; you can then find the .avi video file inside of the appropriate folder. The export folder may be re-named for convenience.

To view AVI movies on the Linux PC use the MPlayer program. If MPlayer does not start automatically then right click on the file and select Open With, then select MPlayer. The files may of course be saved to a USB flash stick to be viewed on other PC’s.
Please contact Aurora Scientific if you have any problems with video export or use of the HVSL/VSL software.