Researchers often have specific requirements for the attachments that they use to connect muscle tissue to an Aurora Scientific high speed length controller and force transducer. Because of these varying requirements, many different types of attachments have been developed and each has its pros and cons. This blog provides details of tying, one of the simplest and most reliable methods.
Tools Required:
- 10-0 monofilament nylon suture
- Tweezers (2 pair)
- Scissors
- Dissection microscope
Method:
In order to use the tying method, a short lengths of fine gauge hypodermic needle tubing must be glued to the force transducer and the length controller (see Technical Bulletin 802D-T02). Each end of the fiber is then tied to the tubes using fine suture (10-0 monofilament nylon suture). Photo 1 shows a small intact muscle tied to a force transducer and length controller. In the photo the wire at the bottom is a platinum stimulation electrode and the needle at the top is a thermocouple. Neither the force transducer output tube nor the lever arm is visible in this photo but the researcher was using an Aurora Scientific model 400A force transducer and a model 318B length controller. An Aurora Scientific model 802 Permeabilized Fiber Apparatus was also used and is shown in photos 3 through 11.
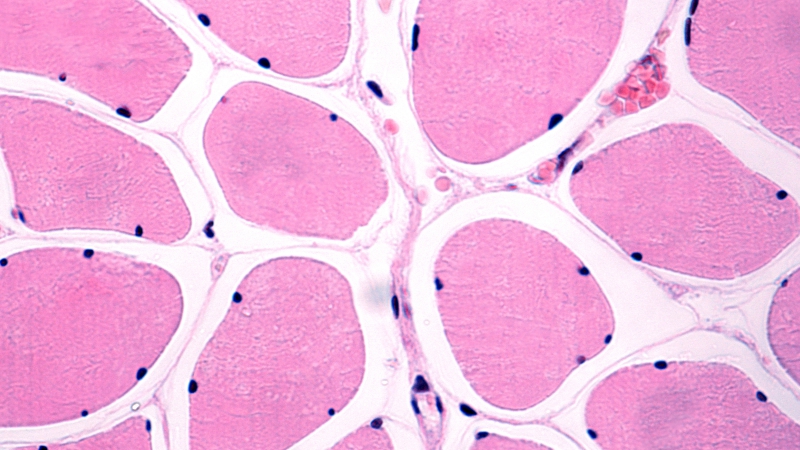
The number of suture loops required is dependent on the expected forces that the tissue will generate. Photo 1 shows a mouse lumbrical muscle that required four suture loops on each end to prevent slippage. Note: whenever you tie an intact muscle you must ensure that no sutures are tied to the muscle tissue itself, only attach the muscle using the tendons. Photo 2 shows a permeabilized fiber that only required 2 suture loops per end to hold it.

Photo 1 Mouse lumbrical muscle tied to 29G hypodermic tubes
(Photo courtesy of Muscle Mechanics Lab – University of Michigan)

Photo 2 Permeabilized fiber tied to 29G hypodermic tubes
(Photo courtesy of Muscle Mechanics Lab – University of Michigan)
For the purposes of this method we will use the example of tying a permeabilized fiber to an Aurora Scientific high speed length controller and to an Aurora Scientific force transducer.
- Align the attachment tubes connected to the high speed length controller arm and to the force transducer such that they are in line. Use the XYZ manipulators that hold the length controller and force transducer to perform this alignment. The tubes should be lined up when viewed both from the top and from the side. Also set the gap between the ends of the tubes to provide sufficient distance for the size of fiber you are using. The tubes can be fully submerged in the bath but they should be a reasonable distance above the bottom of the bath so that suture loops can be manipulated over them. Note: some researchers like to “float” the fiber on the liquid surface of the bath and then bring the tubes up to the fiber. This works fine but in many cases it is just as easy to bring the fiber to the tube. Some experimentation with both methods will let you know which method works best for you.
- Pre-tie several suture loops using a “surgeon’s knot”. See Figure 1 for instructions for tying the knot. Once you have several knots place them over the ends of each tube as is shown in Photo 3.

Figure 1 Surgeon’s knot

Photo 3 Permeabilized fiber bath model 802A with pre-tied loops on the tubes
(Photo courtesy of Muscle Mechanics Lab – University of Michigan)
- Add the fiber to the bath.
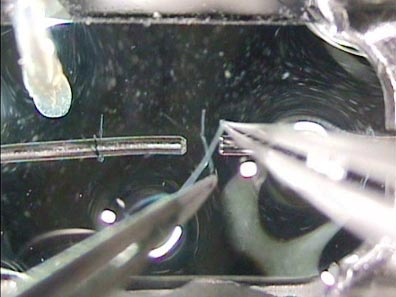
- Pick up the fiber and place a suture loop over it as is shown in Photo 4.
- Place the fiber along one of the two tubes. The fiber will tend to “stick” to the tube which makes it easier to tighten the loops as the fiber doesn’t need to be held in place.

Photo 4 Permeabilized fiber added to the bath with a loop placed over the end of the fiber
(Photo courtesy of Muscle Mechanics Lab – University of Michigan)
- Tighten the first loop to secure the fiber to the tube, see Photo 5. Place the loop about 0.5 to 1mm back from the end of the tube. This leaves space near the end of the tube for extra suture loops. When tightening the loop you should be placing even load on both free ends of the suture loop and pulling the free ends in opposite directions. By balancing the pulling force while tightening you will ensure that you are not pulling the hypodermic tube in any direction. This in turn will ensure that you do not damage your force transducer or length controller. Note: we recommend that you turn the force transducer on while tying as the transducer includes a beeper that will warn you of an overload on the transducer.

Photo 5 First suture loop being tightened to hold fiber to tube
(Photo courtesy of Muscle Mechanics Lab – University of Michigan)
- Take a suture loop from the other tube and place it over the free end of the fiber, see Photo 6.

Photo 6 Second suture loop being placed over free end of fiber
(Photo courtesy of Muscle Mechanics Lab – University of Michigan)
- Place the fiber along the second tube and tighten the second loop to secure the fiber to the tube, see Photo 7. As before, tie this second loop about 0.5 to 1mm back from the end of the tube. This leaves space near the end of the tube for extra suture loops. It is important to try to position the fiber on both tubes so that the fiber is straight and in line. For example, if you tie the first suture with the fiber on the top of the tube then you should try to position the other end of the fiber so that it is on the top of the second tube. Make sure the fiber is not twisted and try to tie it so that the fiber will contract in a straight line.
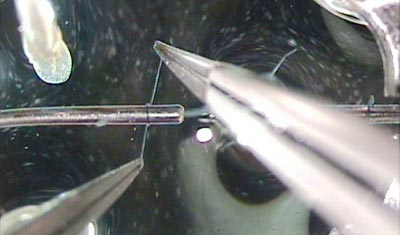
Photo 7 Second suture loop being tightened to hold fiber to tube
(Photo courtesy of Muscle Mechanics Lab – University of Michigan)
- Use scissors to trim the ends from each of the first two loops as is shown in Photo 8. It is important to trim the ends because all of the remaining loops will have to be passed over these first two loops in order to position and tie them in place.
- Take another pre-made suture loop from the tube, slide it over top of the tied suture and place it very close to the end of the tube. Make sure that it is not on the beveled end of the tube as this will cause it to loosen and not hold properly. Tighten the suture as is shown in Photo 9.
- Repeat step 10 for the other tube. If you are using a permeabilized fiber then two sutures on each end of the fiber will probably be sufficient to hold the tissue and prevent slippage. With larger bundles or whole intact muscle you may need to use as many as four suture loops on each end.
- Trim all remaining suture loops using the scissors.
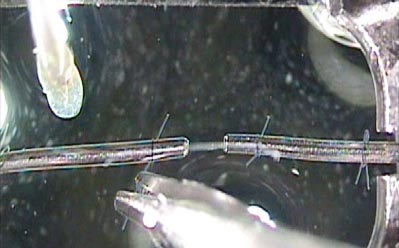
Photo 8 First and second suture loops being trimmed with scissors
(Photo courtesy of Muscle Mechanics Lab – University of Michigan)

Photo 9 Third suture loop being tied close to the end of the tube
(Photo courtesy of Muscle Mechanics Lab – University of Michigan)
- Survey the tying job from above using the dissection microscope or from below using your inverted microscope (if available). Look for the fiber to be straight and not twisted. Look to see that all suture loops are tight; the result should look like photo 10.

Photo 10 Final result when surveyed from above
(Photo courtesy of Muscle Mechanics Lab – University of Michigan)
- Survey the tying job from the side. The ASI 802D permeabilized fiber apparatus includes prisms on either side of bath 1 which make this survey easy to do. Look for the fiber to be straight and not twisted. Look to see that all suture loops are tight; the result should look like photo 11.

Photo 11 Final result when surveyed from the side
(Photo courtesy of Muscle Mechanics Lab – University of Michigan)